
Paver Pedestal System Installation Process
The process of paver pedestal system installation began to take place as early as the Roman Empire era. These pavers were created using the tightly fitting units that are usually set on the compacted aggregate base. They are now considered as the modern version of this base. They are usually created with a vast array of textures, shapes, and colors. The wide variety of choices is especially designed to help match the quality of the home with the addition.
The pavers typically undergo paver pedestal system installation to eventually form patterned surfaces. After locking, they are then placed into service as soon as possible. An apparent benefit of the pavers is the ability to reinstall and remove them if you do not want them anymore. This can drastically reduce the interruptions for the future services.
The use of the concrete pavers rapidly grows for both the residential and the commercial construction stints. Using these pavers is currently expanding at a rapid rate. In some countries, there are around 100 square feet of this addition installed per establishment. This was computed on an annual basis. In other countries, the average installation rate is around a square foot per structure.
The annual survey for the paver pedestal system installation confirms that the continuous growth of the pavers in the other countries has estimated sales to skyrocket at around 710 million dollars. The cost is further divided into around 630 million dollars for the US. Around 800 million dollars goes to Canada.
The concrete pavers company insists that the materials utilized by the contractors for pavement base construction should meet the basic standards of the state when it comes to management of the graded aggregate materials.
The bedding sand for paver pedestal system installation must closely comply with the ASTM C144 and ASTM C33. The contractor assigned to install the pavers should have undergone adequate training to help them utilize the proper types of materials for the task. Also, this can help them thoroughly construct the pavement using the basic recommendations and guidelines of the relevant institutes.
The interlocking pavers used for the projects are extremely durable. The companies manufacture the pavers using the following factors:
Aside from the factors included above, the paver pedestal system installation is performed using a machine operated by a computer unit. This can help form the concrete mixture to numerous shapes. The paver is also manufactured using bevels or chambers.
Easy Installation of Paver Pedestal System
Tile Tech Paver Pedestal System is designed for concrete pavers to lay level over a built up roof. The substrate can be either concrete or wood structure, with a roof membrane over the top.
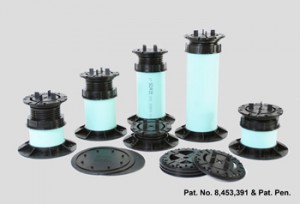
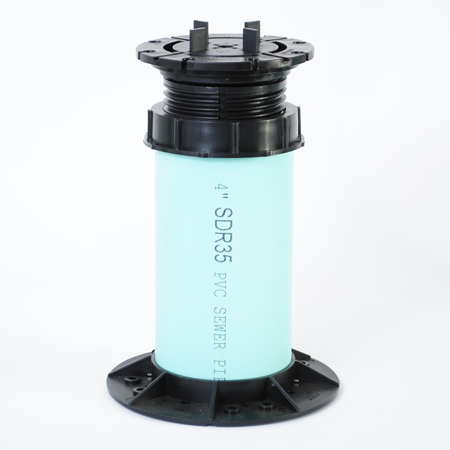
Tile Tech Pedestal System consists of 7 pieces and a standard 4″ diameter PVC pipe:
The PVC pipe allows the Pedestal System to vary in heights up to 20+ inches. The standard 1/8″ vertical spacer on the top cap allows for an open joint and proper alignment of the pavers.
The top cap is 1/2″ in height, if required a 1/16″ or 1/8″ bottom shim locks into the bottom of the top cap. Once 1″ in height is obtained, the top and bottom cap can be used with PVC and 1/8″ and 1/16″ bottom shims.
The uniqueness of the round bottom shims, both 1/16″ and 1/8″ allow them to be broken in half and stacked on the bottom shim for those areas that are sloped more than the typical 2%. They have a “V” groove on the bottom. One pass through with a utility knife, allows for easy breakage. They may be stacked on the bottom. They lock to the cap to impede movement of the pedestal. The subsequent weight of the paver will keep the system in place.
Paver Pedestal System Installation Steps
A typical installation would start off the threshold of a door or control point, provided by architect or contractor. The first height of the Pedestal System pedestal is then determined. (A standard chop saw with fine tooth blade (12″) compatible with plastic) can cut the PVC height insert.
An installer then cuts the PVC to the required height, less the 1/4″ inset for each top and each bottom cap, e.g., a 1-1/2″ pedestal needs 1″ PVC and the 1/2″ top piece which insets 1/4″, plus the 1/2″ bottom cap which insets 1/4″ — making the total pedestal 1-1/2″ high.
The “press fit” of the caps — top and bottom — requires no gluing or other attachments. The caps can be easily removed during installation if desired. Both the small top shims and round bottom shims can be used for “fine tuning” the proper height, if required. All top shims and bottom shims lock into place, and all six pieces (if used) interlock, allowing no paver movement and a level surface.
For proper heights lower than 1/2″ the Tile Tech Pedestal System standard cross, 1″ l ong, 1/2″ high and 1/8″ thick can be used with the Pedestal System standard 4″x4″ square shim, both in 1/16″ and 1/8″ thickness (though we recommend that if construction permits, it is always preferable to have at least a 1″ gap under pavers to allow for airflow and water movement).
The 4″ PVC used in the Pedestal System may be either of two standards: 2729 or 3034. Both are off-the-shelf products, standard in North America with the outside dimension of 4.215″, matching the inside diameter of the Pedestal System top and bottom cap.
Typical use is the thin wall PVC (2729). Independent compression tested from 1″ up to 5″, ranges from 7,000 to 15,750 psi. Thicker wall PVC (3034) 4.210″ OD, 5″ up to 27″ compression tested 11,000 to 13,200 psi. (NOTE: all testing done with both top and bottom Pedestal System installation caps in place.)